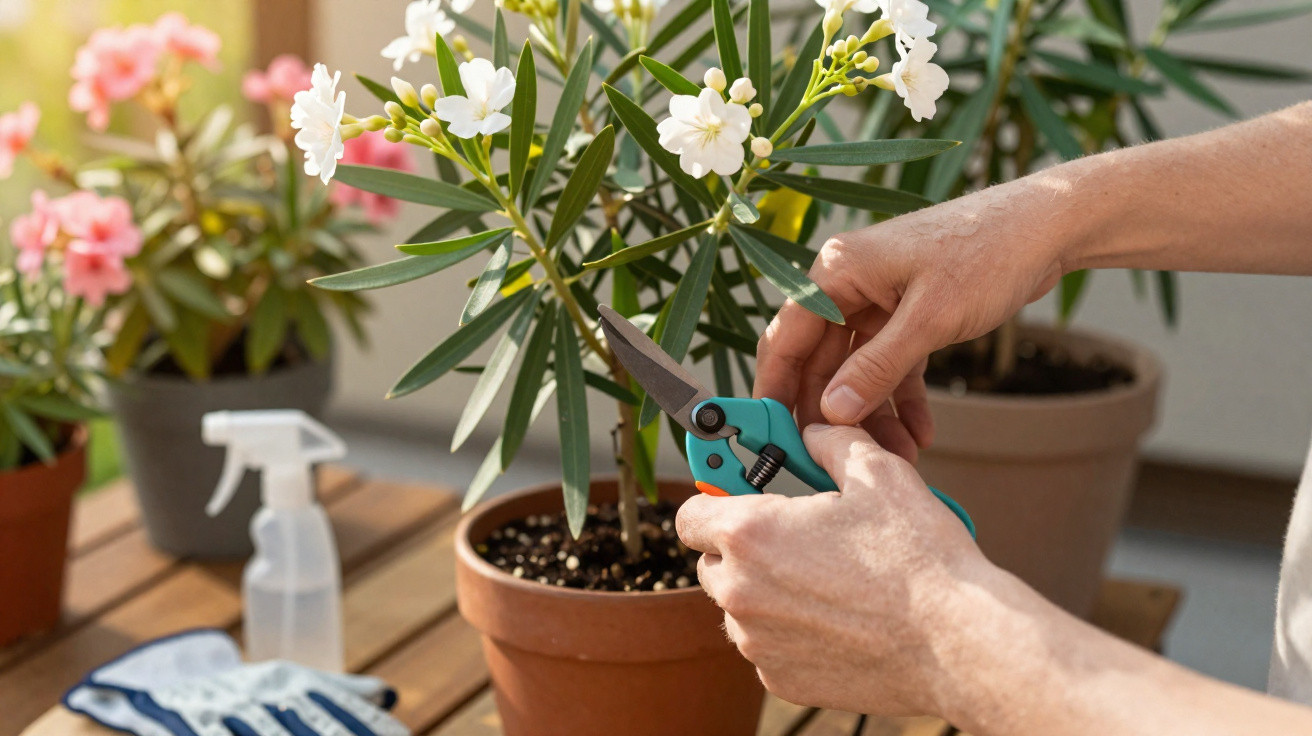
Many amateur gardeners water, feed and hope for the best, then wonder why their neighbour’s oleander is covered in flowers while their own barely produces any buds. The difference is often neither fertiliser nor pot size, but a tiny pruning routine that begins from around 15 April and takes just a few seconds for each shoot.
Why mid-April is a turning point for oleander
Oleander (botanically Nerium oleander, also commonly known as rose laurel) originates in warm climates. Across much of the UK, it is grown in a container and spends winter indoors or in a well-protected spot. Once the risk of severe frost has passed – usually around the middle of April – the plant begins its new growing season.
During this particular period, oleander responds especially well to minor pruning. The aim is to prevent it from continuing to shoot upwards and instead encourage branching and the formation of as many short, flower-bearing shoots as possible.
The mid-April trick is not drastic pruning, but careful fine-tuning – more guidance than mutilation.
Pruning too severely at this stage may remove a large proportion of the summer’s developing flowers. Doing nothing, meanwhile, often results in long, bare stems with sparse foliage and only a few blooms at their tips. A small, deliberate intervention provides the ideal middle ground.
The 10-second technique that encourages flowering
Prepare your tools to prevent infection
Hygiene comes first before working on the shoots. Dirty or sticky secateurs can introduce fungi, bacteria and viruses into freshly cut wounds.
- Clean the secateurs thoroughly.
- Disinfect the blades with alcohol, such as 70% household rubbing alcohol.
- Remove any rust or resin residue where necessary.
A clean cut heals more quickly, dries out more effectively and does not weaken the oleander unnecessarily.
Identifying the right shoots
In spring, two types of shoot are particularly easy to spot on the shrub:
- Overly long shoots that are bare at the base, carrying a cluster of leaves only at the end
- Older flower stems that have finished flowering or now have very little strong foliage
The bare-based, pole-like shoots are particularly suitable for this treatment. They use a considerable amount of energy but produce only a few flowers at the top.
How to make the cut
The actual action really does take only a few seconds per shoot:
- Find a strong leaf node or group of leaves in the upper half of the shoot.
- Position the secateurs around 1 cm above that node.
- Make a clean, slightly angled cut at approximately 45 degrees.
- Remove only the tip rather than cutting away a long section of the shoot.
Gardeners often refer to this as pinching out the growing tip. The purpose is not to turn a two-metre-tall oleander into a knee-high shrub overnight. Instead, the cut simply interrupts the dominance of the shoot tip.
A small cut in the right place redirects the oleander’s energy – away from lengthening growth and towards dense branching with plenty of flowering potential.
What makes the oleander trick work: plant hormones
This small routine can be readily explained by plant physiology. At the tip of every shoot is a particularly active bud area, known as the terminal bud. It produces hormones, including auxins.
These auxins travel downwards and suppress the buds along the shoot. As long as the tip remains intact, it effectively signals: “I am growing; all the others stay on standby.” Specialists call this apical dominance.
Once the tip is removed, this signalling system breaks down in that exact area. The side buds below the cut, which had previously been dormant, are suddenly given the go-ahead:
- They produce new growth.
- They form two to three new side shoots.
- Each of these side shoots may later carry flowers.
Timing is crucial. Pruning shortly after the last frosty nights catches the moment when sap flow is gathering pace again, while the plant has not yet invested all its reserves in long shoots with little flowering potential.
Restoring an oleander’s shape after winter
Many owners will recognise the problem: after wintering in a garage, conservatory or hallway, an oleander can look thin and straggly. Long stems, few leaves and a green tuft at the top create the typical feather-duster effect caused by insufficient light.
Its appearance can make severe pruning seem tempting. Although that may initially appear sensible, it can cost the plant its entire forthcoming flowering display. Buds already formed for summer flowering are often located in the upper sections.
Anyone who shortens everything evenly will usually sacrifice the full floral display for the current season.
A better approach is to work gradually, restoring the plant to a balanced shape over several years.
Step-by-step plan for a feather-duster oleander
- Treat only around half of the longest, most disproportionate shoots in spring.
- On these shoots, cut or pinch just above a strong leaf node as described above.
- Leave the remaining shoots untouched so they can still flower during the current season.
- Repeat the process the following year with the shoots that were spared.
This gradually creates a much denser, sturdier plant without losing an entire year of flowers. The same method works in containers and when planted in a bed.
Care after pruning: water, nutrients and position
Even the best pruning will achieve little if the oleander is then left dry or languishes in shade. A few basic conditions should be met after the April routine:
- Position: Provide as much sunshine as possible; sheltered south- or west-facing positions are ideal.
- Water: The root ball must never be allowed to dry out completely in summer, particularly when the plant is in a pot.
- Feeding: Apply a regular liquid fertiliser for flowering plants, or use a slow-release fertiliser, from May to August.
- Pot size: The container should not be too restrictive, allowing roots to develop, while still avoiding waterlogging.
Meeting these basic requirements greatly strengthens the effect of pruning. The numerous new side shoots need sufficient energy, water and light to form buds and open them successfully.
Common oleander care mistakes – and how to avoid them
The same issues occur repeatedly in gardens and on balconies. Knowing the common mistakes makes them easier to prevent:
- Pruning too early: Cutting back heavily as early as March while late frosts are still possible. The fresh shoot tips can then be damaged by frost.
- Removing everything at once: Taking out all old shoots in one go. Although the plant will grow again, it often does not flower properly until the following year.
- Rushing the pruning: Making hurried cuts across several nodes and leaves. This causes untidy wounds and uncontrolled growth directions.
- A position that is too shady: Even perfect pruning will not create abundant flowers if the oleander remains in shade all day.
Instead, follow the straightforward 10-second action for each shoot and put a reminder for mid-April in the calendar. This creates a sound foundation for a dense, floriferous shrub.
How long does it take before the effect becomes visible?
Patience is required, although the first changes can usually be seen fairly quickly. Within a few weeks, small new buds generally emerge directly beneath the cut points. Depending on weather conditions and the position, these develop into short side branches by early summer.
Flower clusters form on these side branches, eventually giving the shrub the appearance of a ball of blooms. Gardeners who start in April can expect a clearly visible reward from June or July in many areas.
Safety note: oleander is poisonous
However impressive the flowers may be, one important point must not be overlooked: every part of the oleander contains toxic substances. Even small quantities can cause problems for people and animals, especially children and pets.
- Always wear gloves when pruning.
- Do not dispose of cuttings on the compost heap if animals can access it.
- Never burn plant material, as the smoke may contain irritant substances.
Following these rules while adopting the April routine can give you an impressive flowering shrub for many years on a balcony, terrace or in the garden, shaped with only a few carefully timed actions.












Comments
No comments yet. Be the first to comment!
Leave a Comment