On the first pleasantly mild days of spring, countless gardeners head outdoors with high hopes, only to come back later with… twisted carrots.
The yearly pattern is well known: seeds are sown with care, watered for weeks, and eventually yield knobbly, forked roots alongside memories of long hours spent thinning seedlings. However, a straightforward sand trick can transform carrot growing, removing the most tiresome jobs and producing straighter roots with much less work.
Why carrots fork – and why thinning frustrates gardeners
Carrots may seem uncomplicated, yet they are remarkably unforgiving. Their seeds are minute, their roots push far into the soil, and any crowding or stress can become apparent on your plate several months later.
Most forked carrots start with one basic problem: too many seedlings, too close together, in soil that resists their roots.
When carrot seed is tipped directly from the packet, it often lands in clusters. The resulting young plants compete for water, light and room. Their roots can wind around one another, encounter small stones, or divide into multiple branches.
The usual answer is thinning: manually removing surplus seedlings while kneeling over each row for a long time. Although effective, it is slow and can feel rather disheartening when you discard half the plants you have carefully raised.
The sand trick that spaces carrots for you
A practical alternative to later thinning
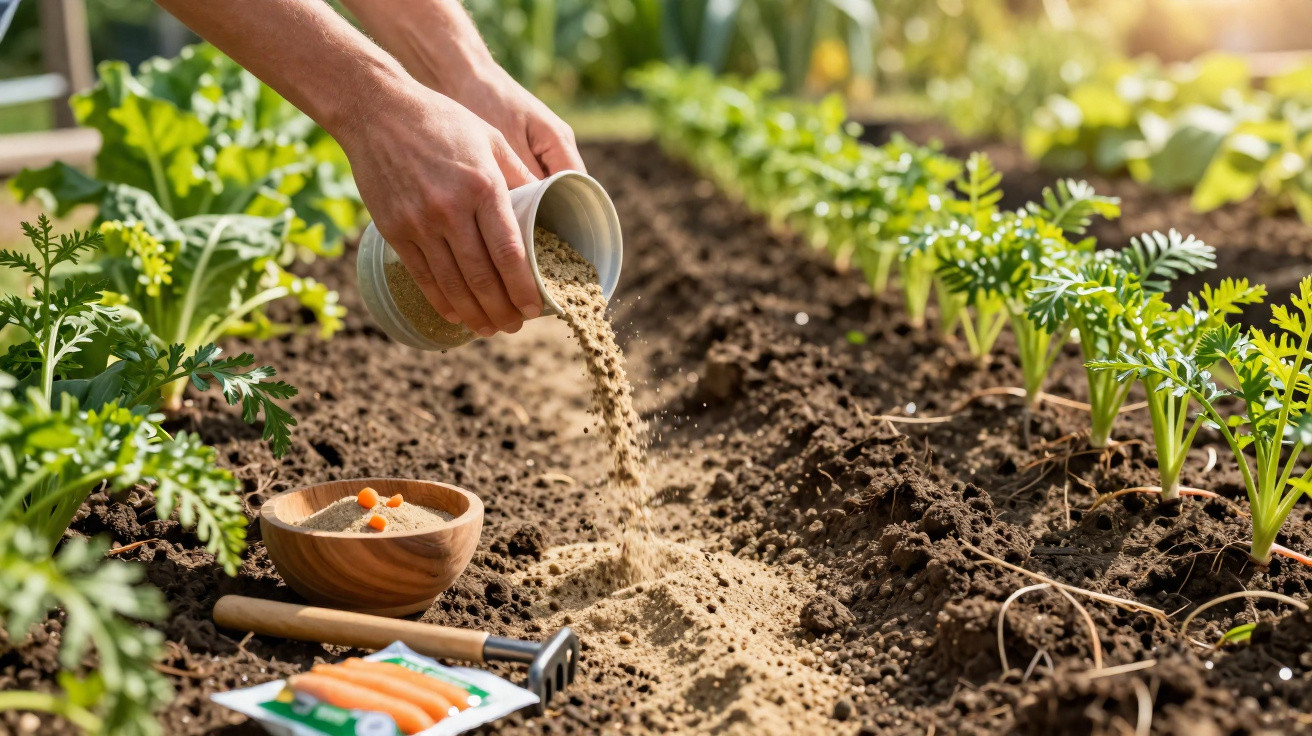
French gardeners have made popular a technique that eliminates this laborious thinning stage. Its idea is extremely simple: rather than placing each seed at a precise distance, dilute the seeds in dry sand so they naturally spread apart as you sow.
Mix one part carrot seed with ten parts dry sand, then sow that blend in a shallow drill. The sand becomes your invisible spacing tool.
Sand distributes the seeds and prevents them gathering in clumps. Every grain helps create a small separation. As you pour the blend along the row, you are essentially sowing a “living ribbon” of evenly spaced future carrots.
The 1:10 ratio: why it matters
This ratio is central to the technique:
- 1 volume of carrot seed
- 10 volumes of very dry, fine sand
With too little sand, the seeds will still collect together and the roots become crowded again. With vastly too much, the rows may be overly thin and the harvest reduced.
The sand needs to be dry, allowing the seeds to flow freely rather than stick together. Builders’ sand or play sand are suitable provided they are clean and salt-free. If it feels moist, spread it over a tray indoors for a day.
Preparing the perfect carrot bed
Deep, loose, stone-free soil
Even faultless spacing cannot prevent forked carrots in unsuitable soil. Roots struggle when they meet stones, dense clumps or compacted layers.
| Soil feature | Effect on carrots |
|---|---|
| Stones and rubble | Roots bend, split or fork around obstacles |
| Heavy clay, unbroken | Roots widen or branch rather than penetrating |
| Fresh manure or rich compost lumps | Sudden nutrient pockets cause distorted shapes |
| Fine, deep tilth | Carrots grow long and straight with fewer defects |
Loosen the upper 20–25 cm of soil using a fork instead of a spade, which opens it up without overturning large clods. Pick out stones by hand. Do not add fresh manure before sowing; if the ground is very poor, incorporate well-rotted compost several months beforehand.
The ideal depth and spacing
Carrot seeds contain little stored energy. When they are planted too deeply, they can exhaust themselves before reaching daylight.
Keep drills shallow: about 1 cm deep is enough for carrot seed, even in March.
Create a narrow groove with the handle of a rake or hoe. Target the following:
- Drill depth: about 1 cm
- Row spacing: roughly 25 cm apart
A 25 cm gap between rows allows air to circulate around the plants. This lowers the likelihood of fungal disease and leaves sufficient room to hoe between rows when weeds emerge.
Mixing the “carrot and sand” blend
Step-by-step preparation
Use any suitably consistent vessel to measure the seed and sand, whether a teaspoon, small cup or shot glass. Its size is irrelevant; maintaining the ratio is what counts.
- Tip one measure of carrot seed into a clean bowl.
- Add ten measures of dry sand.
- Mix gently but thoroughly for at least a minute.
You are aiming for an entirely even blend, where seeds are dispersed throughout the sand rather than gathered in pockets. There should be no clearly visible clusters of seed.
Use the mixture straight away, or store it in a dry, covered container for one or two days. Moisture is the enemy at this point because it can trigger premature germination and make the contents clump.
Sowing with the sand blend
A clear, stress-free line
Move along the drill, pouring the mixture slowly in a slim, continuous line. Your fingers, a small cup or a cut plastic bottle can all serve as an improvised sowing funnel.
The pale colour of the sand stands out clearly against dark soil, so you can instantly see gaps or heavy patches and correct them.
After filling the drill, use the back of a rake to draw soil lightly over the mixture. Avoid covering it deeply. Pressing it gently with your hand or the rake head improves seed-to-soil contact without firming the bed too much.
Watering without washing everything away
Freshly sown carrot seed requires reliably moist conditions, but it does not tolerate being washed from the ground.
- Choose a watering can with a fine rose or a hose set to a soft spray.
- Apply water as gentle “rain” rather than a forceful jet.
- Maintain evenly damp soil until the seedlings are clearly visible.
Gardeners often call the ideal soil “kind” or “friendly”: cool and moist when touched, crumbly, and neither baked solid nor muddy. This consistent moisture encourages uniform germination.
The patient bit: waiting for germination
Temperature sets the tempo
Carrots are slow to get going. According to soil temperature, expect to wait:
- 10–12 days in warming late spring soil
- Up to 20 days in early, cool March conditions
During this period, the most useful thing you can do is keep the surface from drying out while resisting the urge to poke around for seeds.
Where conditions are windy or the soil dries rapidly, a light plank or strip of white fleece placed over the row can help hold moisture in. Take it away as soon as the first tiny leaves emerge, so they receive adequate light.
What you notice when the leaves appear
No more mass thinning sessions
Once the feathery carrot leaves unfold, the impact of the sand becomes clear. Instead of crowded little groups, seedlings appear at sensible intervals.
You may still need to pinch out an occasional pair that has come up too closely, but the old practice of taking out every second plant down a row largely vanishes.
Less thinning means less root disturbance, fewer chances for carrot fly to sniff out damaged plants, and more time for other parts of the garden.
Straighter, healthier roots at harvest
Several months later, when you lift the first carrots, the advantages are especially evident. Each root has had the space needed to grow downwards without competing with neighbouring plants.
You are much more likely to harvest long, even, firm roots instead of two- or three-pronged specimens that appear to be trying to escape. This is not merely more attractive: straight carrots are simpler to peel, store and cook evenly.
Extra tips: varieties, pests and small-space tricks
Choosing varieties that help your soil
Variety and soil need to be considered together. For shallow or stony ground, shorter “Nantes” or stump-root types are better suited than longer “Berlicum” or “Flakkee” styles. Longer varieties can make the most of improved structure and spacing in deep, sandy beds.
Organic seed ranges frequently offer varieties chosen for toughness rather than exhibition-style appearance. Used alongside the sand method, they can nevertheless look very smart on the plate.
Carrot fly and companion planting
Carrot fly is drawn to the scent released by damaged foliage. As this approach reduces extensive thinning, it produces fewer strong scent signals.
Some gardeners sow short rows of onions, chives or leeks nearby in the hope that their smell confuses pests. Others cover early carrot rows with fine mesh from the first day. The sand technique works equally well with either method.
For beginners and balcony gardeners
People new to gardening often try carrots first, then soon regret their decision. The sand approach makes this demanding crop more like a “set and watch” project, helping build confidence for later seasons.
The same method is equally effective in containers. Choose a deep pot filled with free-draining peat-free compost, remove any lumps, then sow the sand mixture in short arcs or circles. You may not produce exhibition roots, but you will avoid the tangled mess that commonly develops in pots.
There is also a final, less obvious benefit. Handling such tiny seeds can be daunting. Combining them with sand makes sowing more tactile and forgiving. Stirring, pouring and gently firming the soil brings you closer to the process and, in a small way, alters how you view seed, soil and space.







Comments
No comments yet. Be the first to comment!
Leave a Comment